Showing posts with label gadget. Show all posts

Tuesday

Image Title Issue ~ Fix & Freebie

I know many of us have struggled for a long time with the "Image" gadget. Gone were the days when we could leave the "Title" area blank.  It had been nice when using sidebar tags because, well let's face it, using a title above a title is a bit redundant. ;~)

Recently while wandering through blogland I happened upon a fix (yay!).  It seems that whenever you type in a small snippet of code, it tricks the gadget into thinking there's a title so when published, nothing shows up. This enables all of us using tags to once again use them as section titles, whoot!

Here is the code:
<!--->

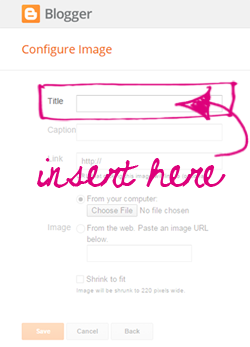
Just type or copy it into the "Title" area of the Image gadget, insert your image and then click save ~ you'll be all set!

To celebrate I'm offering this free set of sidebar tags! Just click the button below to download and save the set to your computer. They can be used as section titles or even linked images if you prefer.   I've included a lot of extra titles too (more than my regular sets) so you've got a lot more options for uses. Just remember to add that snippet of code above and you'll be all set!


Enjoy~

Saturday

Etsy Mini Fix

If you're an Etsy seller then you've probably experienced the same issues I have when trying to get an Etsy Mini to show up.  It seems when Etsy made some changes to the code, about a year ago, the gadgets stopped working on Blogger.

Well I'm happy to say I've just stumbled upon a fix ~ Annie over at Anniedep  has come up with some altered code that makes the gadgets work on Blogger ~ whoot!  Here's a link to her posting: http://anniedep.blogspot.com/2012/06/etsy-mini-doesnt-display-in-blogger.html

If you follow the instructions you'll end up with a 2 column, 2 row layout, like the example shown above (only bigger). If you want more inventory to appear you can easily change the numbers in the code.  Here's an example of a 2 column, 4 row layout with the modifications explained below..

Referring to Annie's code ~ change the 2 after "rows=" to 4 and change the 238 after "height=" to 430.
I also figured out how to add the larger gallery version to a blog post or page so we can once again easily offer "galleries" of items for sale on our blogs.  For an average width blog page a 2 column, 4 row layout works best so I've included a screen shot and the code below for that layout.


Remember, be sure to stop by Annie's original post to find out how to install your own Etsy shop number so your inventory will appear.

Enjoy~

Tuesday

Favicons Made Simple

Today I'd like to talk about a new feature I noticed while roaming around the back end of my blog. I noticed a new item I hadn't see before, there under the "Design" tab was a new goodie titled Favicon.

Now, for those of you who aren't familiar with this term, a favicon is the little icon associated with a website. It can appear in the address of a website or in your browser's favorites & bookmarks area. Mine is the little plumrose inserted above as an example. These icons cater to the part of our brains which absorb symbols and icons, as described by Carl Jung, but we'll save that topic for another day...

Blogger has now simplified the process of adding a favicon icon to our blogs; where we once had to dabble in the html code section of our blogs, we can now easily upload an image and voila! Our own personal favicon appears
. So, if you're interested in adding your own favicon to your blog simply navigate to the "Design: tab of your blog and click the "Edit" link next to the Favicon object to upload an image. I'm not sure if there are size minimums as favicons are usually very small, so here's a link to generate a free tiny favicon online ~ Dynamic Drive Favicon Generator.

Enjoy~

post signature